Introduction:
Scheduling appointments efficiently is crucial for maintaining smooth operations in any medical practice. Embark EMR provides multiple convenient ways to access the Schedule New Appointment dialogue box, ensuring that appointments can be set up quickly and easily. This article will guide you through the three methods to open the appointment dialogue and the steps to complete the scheduling process.
Accessing the Schedule New Appointment Dialogue:
Embark EMR offers three easy methods to begin scheduling a new appointment:
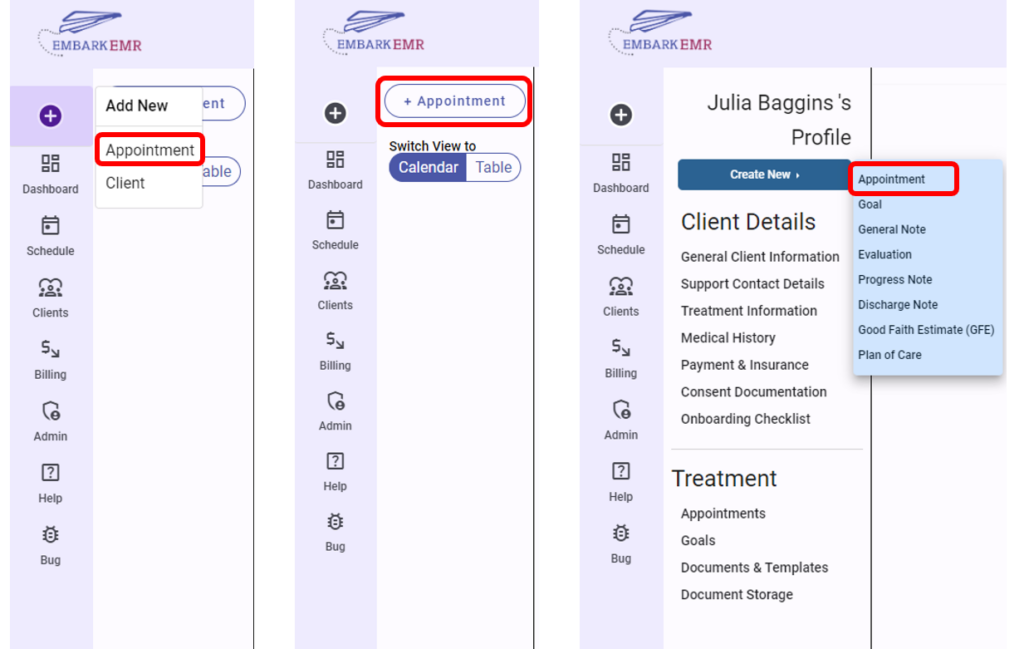
Quick Access Button:
- Navigate to the top of the left main menu and click the “+” quick access button.
- From the dropdown menu, select “Appointment” to open the new appointment dialogue.
Scheduled Section:
- Click on the “Scheduled” section from the left main menu.
- In the top left corner of this section, click the “+ Appointment” button to bring up the appointment scheduling dialogue.
From a Client’s Profile:
- Go to a client’s profile page.
- Click the “Create New” button located in the top left corner, then select “Appointment” from the subsequent options.
Completing the Appointment Form:
Once the Schedule New Appointment dialogue box is open, follow these steps to complete the appointment setup:
- Select the Client:
- Choose the client for whom the appointment is being scheduled from the dropdown menu.
- Choose the Provider:
- Select the provider who will be seeing the client.
- Reason for Visit:
- Enter the reason for the visit to ensure the provider is prepared for the appointment.
- Specify Location:
- Choose the location where the appointment will take place, especially important if your practice operates across multiple clinics.
- Set Date and Time:
- Determine the specific date and time for the appointment, ensuring it fits within the provider’s availability.
- Recurring Appointments:
- If the appointment needs to recur, select the appropriate option (Weekly or Bi-weekly) from the Recurring Appointments dropdown menu.
- Automated Appointment Reminders:
- Choose to set up automated reminders by selecting the desired frequency from the options provided. This ensures that both the client and the provider are reminded ahead of the scheduled time, reducing no-shows.
- Finalize the Appointment:
- Review all the details to make sure everything is correct.
- Click “Add” to schedule the appointment. The appointment will then be added to both the provider’s and the client’s calendars.

Conclusion:
Scheduling an appointment in Embark EMR is designed to be a straightforward and flexible process, accommodating various ways to access the scheduling function. By following these steps, you can ensure that your appointments are set up efficiently, enhancing the operational flow of your practice and improving the overall experience for your clients and staff.
Tip: Regularly update and review the appointment details if any changes occur before the scheduled date to maintain accurate and up-to-date schedules in your EMR system. This proactive approach helps in managing the expectations of all parties involved and ensures smooth day-to-day operations.